Pages

Monday, 23 February 2015

patchwork and a winner...

 
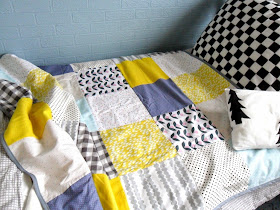
...it's a few years since I started my little patchwork journey, it took me a while to find my own style and look but I always knew it would be mostly about choosing colours and fabrics. last weekend I gathered all the ones I have kept and put them together to get some inspiration for making some more. they are a mix of bright retro patterns and low volume neutral styles. probably because I live in house with three lads I have gone towards the simpler styles recently but my heart still skips when I see those bright patterns all stitched together. Would love to know which you prefer?


making these in one or two colours was a bit of a challenge at first but we have really toned down the patterns in our house recently so they go really well. I use my own templates by working up a design on squared paper and then scaling it up onto card, secretly hoping that my bad maths has worked and it will all fit together! I am continually amazed by those patch workers who do their own intricate designs and blocks.


this little pile of colour makes me happy and the pillows below were a rainy day project using some lovely grid fabric and a tea towel, 
 

and lastly I haven't forgotten that there is a giveaway winner to be announced...thank you so much for all your entries, I decided the easiest way to pick out the winner would be to pick a number and then count down the comments. so....the winner is Mrs Robinson well done!! (I have that song in my head now!) I'll be in touch very soon to arrange sending your happy package on it's way.

 I'm feeling a bit of spring in the air today...have a lovely week x x

Sunday, 15 February 2015

giveaway...


hello, as promised I have a little giveaway this week...its a crafty supply kit comprising of some of my vintage wallpaper, some lovely quilters cotton fabrics, large lolly sticks to make these, some labels and tags, some note cards, envelopes, an envelope filled with confetti and notes, and some card people and split pins for making these. It should keep little hands busy for a while.
I'm an avid collector of craft supplies, always have been...when the boys were younger the cupboards were always full of googly eyes, felt, glue sticks and empty boxes. I often wish I had been blogging when they were little as we were prolific makers..I remember we would have a little party most weeks for no reason other than to make all the decorations and food. I think people thought I was nuts!
Any how... back to the giveaway... this post is just a little thank you for sticking around and popping back to see if I'm still here, I really do appreciate it and your comments and words of encouragement. To enter just leave a comment below :)
The giveaway will run until Fri 20th Feb and I will pick out a winner soon after.
Good luck x x


Monday, 9 February 2015

snail mail...


one of my plans this year is to send more letters...so I have been making some note cards to add to my stationery collection.
they were really easy to make,
if you fancy a go you will need
white card, pretty tapes, scrap papers, hole punch, small stamp envelopes or tiny cello bags, rubber stamps in various designs, ink pads, scissors.
Stamp some designs on to the white card, cut them out, make some paper confetti with the hole punch and scrap papers, then add them to the small envelopes fold over the top and stick to a card blank with tape.
I added a message with an interchangeable stamp I got from Hema.
If you don't have any rubber stamps you could draw the messages on or use cut outs from old cards, you could make the small envelopes from folded baking paper or tracing paper.They could make cute valentines messages.

I'm putting together a little giveaway at the moment, it is going to be a craft pack of supplies so there will be some of the items from this post and the previous happy people post plus fabric and papers :)
have a lovely week x

Tuesday, 3 February 2015

tutorial : happy people banner


inspired by my obsession with those little paper cut out dressing up books I had as a kid and the fact that I love drawing happy faces...I've done a quick tutorial on how to make a little garland.
You will need, card, scissors, pencil, felt tip pens, glue, paper scraps and some metal split pins..
 
 I found these blank paper cut outs in a local shop but they are so easy to make I added a few extra ones with some card I already had . You could sketch out a simple shape as a template and then make as many as you need.
 
 then all you need to do is cut out clothing shapes and glue them on and draw on their faces :)


to join them together just push a split pin through the hands and fold out the back of the pin like below...


this one keeps me company on my desk :) I love her little denim dress! 

so there you go, some other ideas could be animals instead of people or you could get the kids to draw their friends or family... you could do costumes // superheros // favourite characters //you could add buttons, fabric, wool for hair etc...I used magazine pages and wrapping paper as well as scrapbooking and origami papers
Have fun x